How to Launch a Website for Your Photography Business

July 28, 2022
category |
Written by |
Before we get stuck into it, heads up, this blog’s going to be an absolute BEAST because we’ll be diving into the nitty-gritty of how to create a brand-new website for your photography business in 2023 – from scratch. Whether you’re just starting out or have been in the industry for a while, bookmark this blog because it’s the ultimate 101 guide and chockful of gold nuggets.
First up, let’s tackle the ever-popular, always-debated “Does a photographer need a website?” question!
Short answer:
Yes.
Long answer:
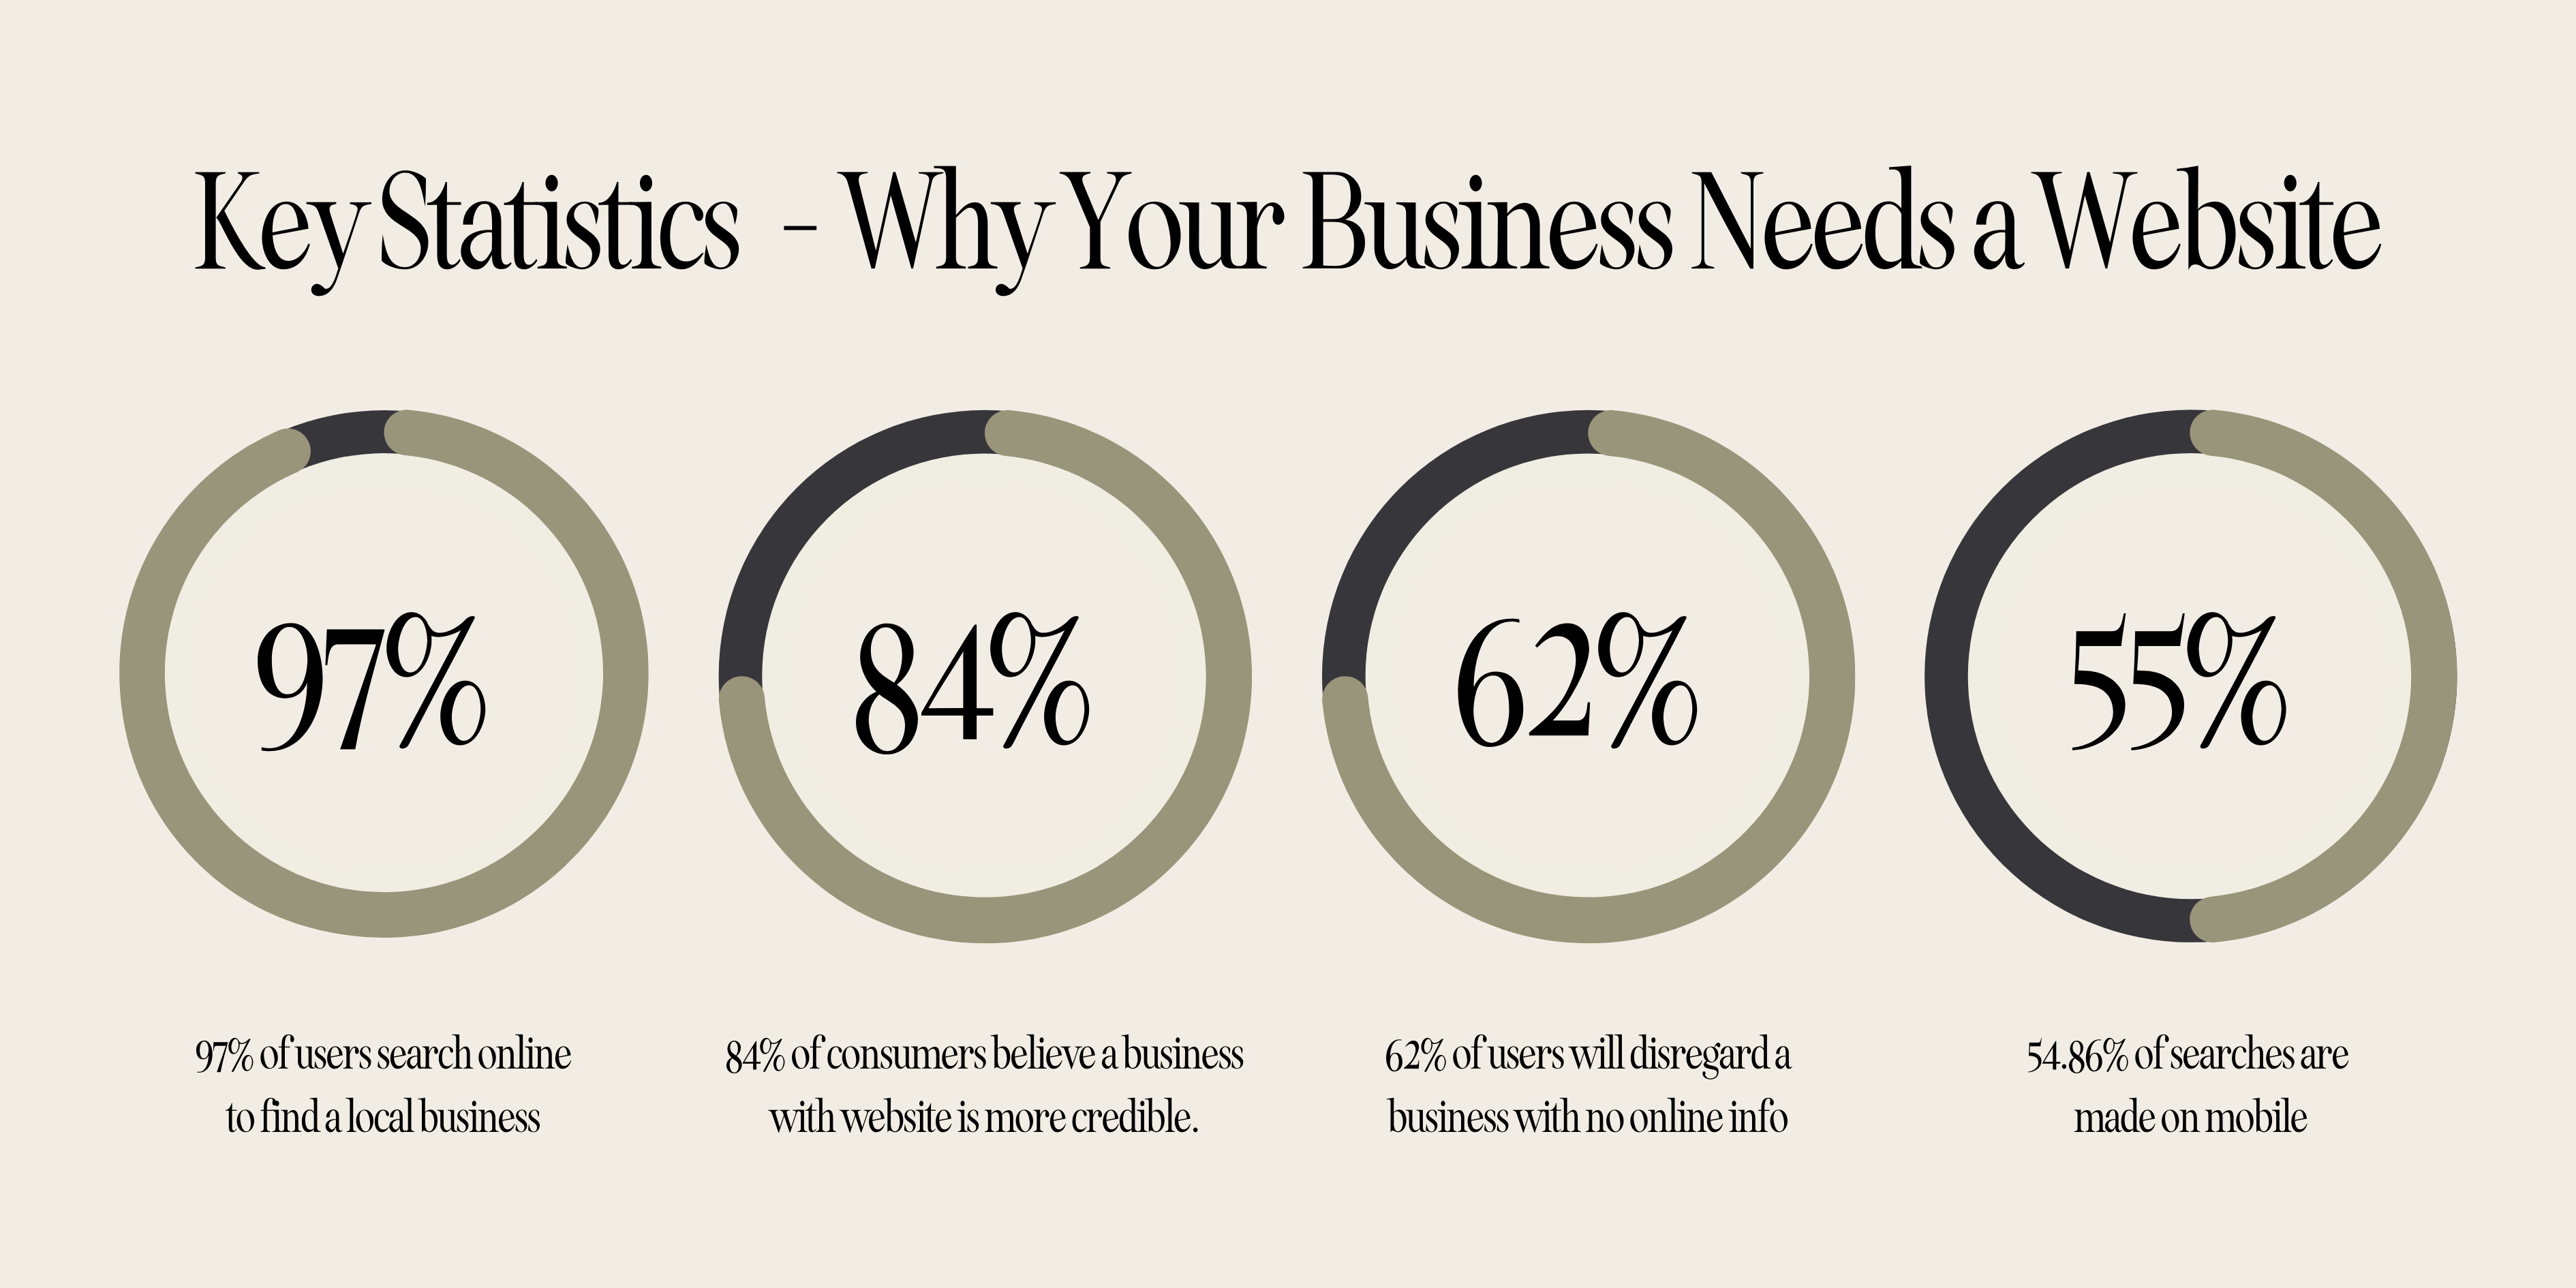
Yes, if you want your photography business to gain and grow an online presence in today’s digital world. A whopping 97% of people use online search to look for local businesses (e.g. “Best Wedding Photographer in Melbourne”).
While you may still receive word-of-mouth referrals and/or enquiries through your Instagram profile, a website can expand your audience beyond your inner circle.
Statistics sourced from Safari Digital and Smart Insights.
Here are 3 big reasons why you need a website for your photography business
1. Boosts your credibility
As Wikipedia’s co-founder Jimmy Wales says “If it isn’t on Google, it doesn’t exist.” People are actively searching online for solutions to problems they’re wanting to solve, using a mix of generic, specific and branded search phrases, as well as asking questions and using locations.
If you don’t have a website, you’ll have zero chance of getting clicked on – and unless you’re happy for your competitors to dominate the search results, you NEED those clicks.
2. Attracts new leads
84% of consumers believe a business with a website is more credible than one that only has a social media page. People are relying on your website to provide them with the credible information they need to make an informed decision. It lets people know who you are, how you can help, why they should care, and most importantly, TAKE ACTION.
Your website acts as your shopfront, bringing in leads and giving you an opportunity to convert them into paying clients. Show off your unique personality and amazing portfolio, and let them know exactly how you can serve them!
3. Streamlines your workflow
Available online 24/7, your photography website will save you time and energy. Providing all the information potential clients are looking for, from your location and hours of operation to available packages, you’re cutting down the back-and-forth emails.
You can integrate your CRM with a killer contact form, embed meeting scheduling tools, make announcements, build your newsletter database, sell albums, and so much more!
How much does it cost to create a professional photography website?
Just like asking “how long is a piece of string?”, there’s no straight answer. While you can technically build a photography website for “free” with platforms such as WordPress, Wix, and Pixieset, to name a few, there’s always a catch. Just one example, you won’t be able to create a professional custom domain (e.g. www.queenmelindaphotography.com) and will be stuck with something cumbersome like www.queenmelindaphotography.wordpress.com instead.
Limited by the platform’s free plan offerings – which is ALWAYS the bare minimum – you also won’t have creative control over the aesthetics and layout of your website.

If you’re opting for the DIY route, with more flexibility than free plans, you’ll be able to find semi-decent subscriptions starting from $20 per month.
If you want to have an entire custom website built professionally, the average cost of website design can range anywhere between $5,000 to $10,000+ in Australia. However, you’ll always be able to find “cheaper” options, especially if they’re starting out and wanting to grow their portfolio. But remember, you get what you pay for so do your due diligence when researching and clearly communicate your expectations.
Rather than trying to save money now, and then having to redesign your website all over again in the near future, set yourself up for long-term success. Always consider the realistic opportunity costs – would you rather settle for a poorly-designed website that costs you visitors and enquiries to save money in the short-term – OR – would you rather have a beautiful, functional website that does justice to your biz while converting browsers into leads from the get-go?
Now that we’ve covered why you need a website for your photography business and budgeting costs, let’s dive into the HOW!
From pre-build background research through to post-launch testing and announcing your new website, I’ve broken it all down into 21 steps.
- Steps 1-8 cover your research & pre-planning.
- 9-14 cover your website build process.
- 15-20 cover publishing/ launching your website.
- Step 21 covers the announcement!
To keep it as simple as possible, I’ve also linked to additional helpful resources and other articles should you need to dig deeper into particular topics.
HOW TO LAUNCH A WEBSITE FOR YOUR PHOTOGRAPHY BUSINESS in 21 steps
You can use the below table of contents to skip straight to specific sections.
Everything you need to know about creating a photography website
- Choosing the best website domain name
- Sourcing inspiration
- Choosing the right website platform
- Establish a consistent brand look & feel
- Map out all required pages
- Plan the layout of each page
- Draft your website copy
- Collate FAQs
- Start building your website
- Images
- Linking your socials
- SEO basics
- Mobile-friendly website experience
- Create a pre-launch checklist
- LAUNCH YOUR SITE!
- Set up Google Search Console
- Implement Google Analytics & check integrations
- Test user experience – again
- Check your website speed
- Back up your website
- ANNOUNCE & celebrate your new website!
.
1. Choose the best domain name for your business
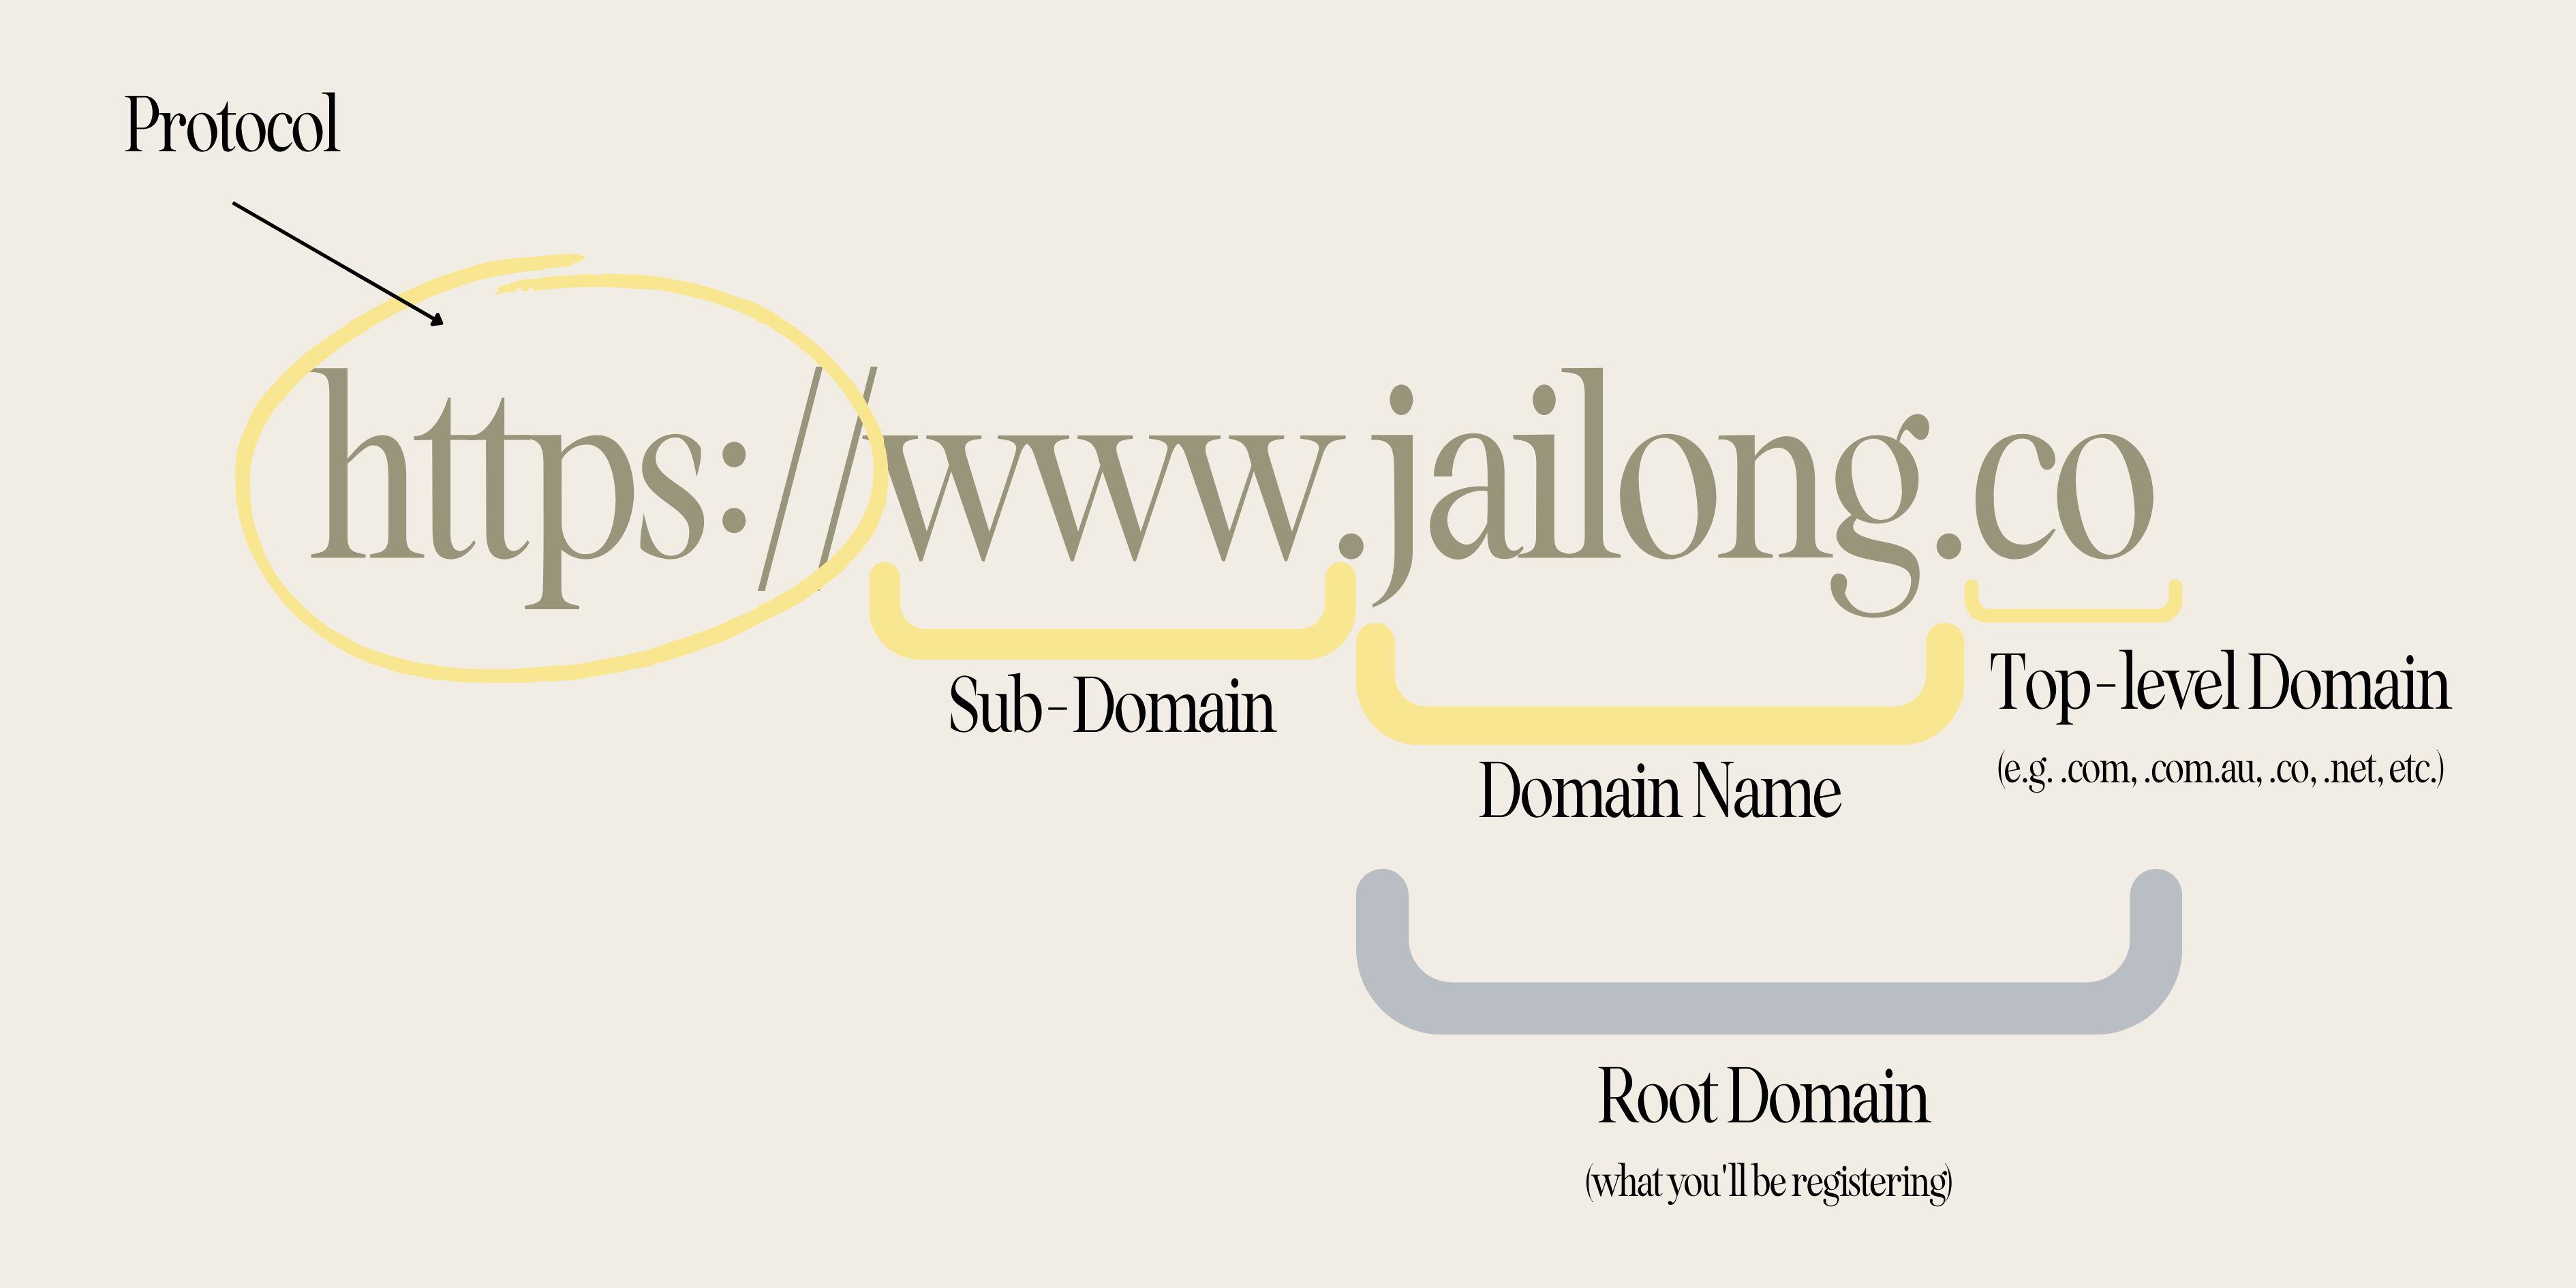
A domain name is your website’s address. For example, our root domain is jailong.co. It’s important to try and get your domain right from the get-go because changing it down the track can be challenging, from potential traffic loss to unwanted downtime.
You can check if your preferred domain name is available to use with free tools such as https://www.domainregistration.com.au/domains/
- Keep it on brand (and match it to your social media handle if you can) – e.g. if your business name is “Jai Long Photography”, then aim for a root domain name like “jailongphotography.com” if it’s available.
- Avoid overly long or complicated URLs that are harder to remember – e.g. “jailongweddingphotography.com” or “jai-long-wedding-photography.com”
- Choose your top-level domain extension wisely. As the last part of your URL, the most popular options are .com, .net, and .org. If you only operate within your country, using Australia as an example, you can also opt for .com.au to signal that you’re an Australian business.
- Think long-term! If you’re thinking of offering videography in the future, then don’t limit yourself to a URL like “jailongphotography.com” which might suggest you only offer photography services.
- Integrate keywords if possible. If you can include “photography” or broad keywords that clearly communicate what your business does, while keeping it memorable, do it! For example, “jailongphotography.com” instead of “jailong.com”.
You can learn more about domains here.
2. Source inspiration from other websites to gauge your overall style
The keyword here is “inspiration”, NOT to copy or imitate. You are one of a kind so the last thing you want is to come across as same-same and risk getting lost in the sea of digital clutter. However, if you’re not sure where to start, it’s always a good idea to research other websites and gather inspiration for what you like and/or don’t.
Plus, don’t restrict yourself by only stalking other photography businesses! Source ideas from other industries, whether they’re beauty/ furniture/ lifestyle brands or your favourite indie band, there’s inspiration everywhere.
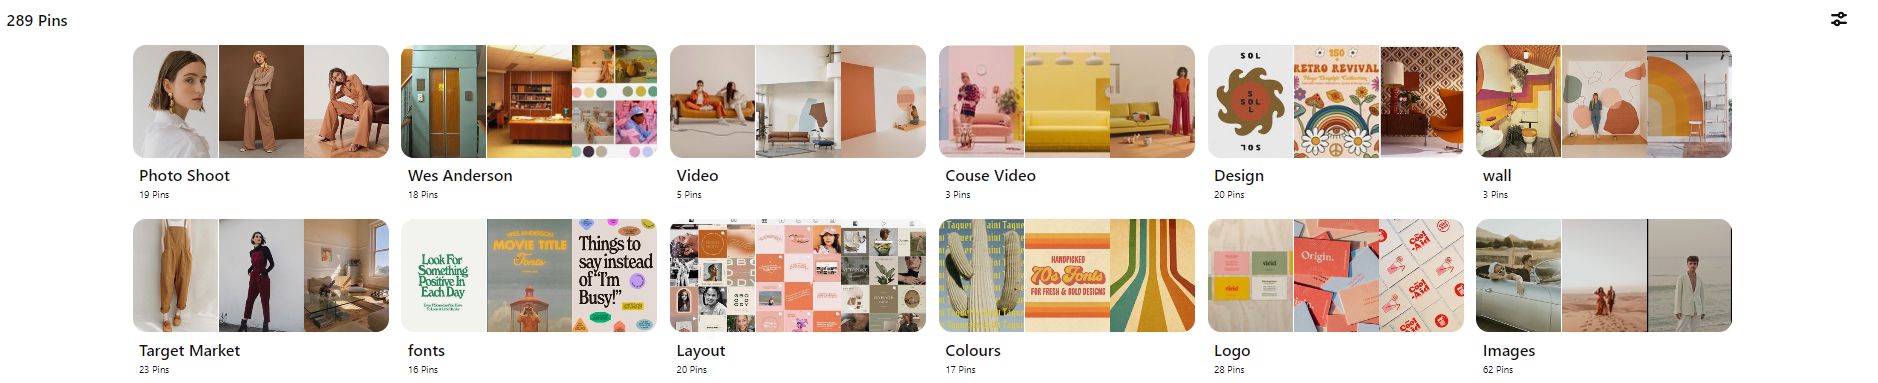
Here’s a peek at the Pinterest boards we created for our Jai Long Co. rebrand, everything from the website to the branding shoot!
Once you’ve gained a clear idea of an overall style, make sure you also reflect on how you want YOUR brand personality and messaging to be perceived.
3. Research & choose your website builder
Now that you have a rough idea of how you’d like to present your business, it’s time to choose the best website builder! Factoring in your tech-savviness and design capabilities, choose a website builder that you’re sufficiently comfortable making updates on in the long term. Rather than always outsourcing it, you should be able to add new testimonials, update copy, upload new images or post blogs yourself.
Showit, Squarespace, WordPress, Wix, and Pixieset are currently the most popular website builders for photographers. Research the pros and cons of each website builder by checking out their pricing plans, demo templates, functionality and customisation abilities.
Instead of building your entire site from scratch, you can also purchase customisable templates for your preferred website platform from professional web designers.
We personally recommend Showit because it’s a drag-and-drop website platform that’s been created for photographers and visual creatives. No coding is required. Showit provides 100% creative freedom over the layout and design of your website – on desktop and mobile!

Check out Studio Leelou’s scroll-stopping Showit website templates for some inspo!
Alright, I know what your next burning question will be…
“Which website platform is best for SEO?”
Yes, not all website builders offer the same level of SEO tools. To date, WordPress is often looked upon as the holy grail of SEO-friendly website platforms but times are changing and options are growing. If you are confident in your SEO prowess and navigating a less design-intuitive platform, then you’ll enjoy WordPress’s optimisation plugins and scalability.
Most website builders will come with basic on-page SEO features if you know how to use them properly. However, your website won’t magically rank just because you’ve used an SEO-friendly website builder and thrown in some keywords.
SEO is a long game that requires your ongoing dedication to learning, strategising, and staying updated with the latest ranking factors. If you want to maximise your online search presence, you’ll need to implement a mix of on-page SEO, off-page SEO, and technical SEO.
TL;DR: Regardless of your SEO knowledge and/or technical skill, it’s ultimately best to choose a platform that’s easy to learn and matches your specific long-term business goals.
4. Determine a consistent brand look & feel
Whether it’s your website, socials, price guide, business card or packaging, all your online and offline touchpoints should reflect consistent branding. From your logo to your chosen fonts and colour palette, it’s essential that everything flows together. This is the key to creating an on-brand experience that helps you to stand out from the crowd.
If you’re tired of messing around in Canva, invest in a branding designer who can help you brainstorm and establish your visual identity. As your business grows and evolves, you can always undergo a brand refresh or overhaul down the track.
5. Map out all the pages you need on your website
Your website will act as your online shopfront, educating (and exciting) people on why you’re the best decision they’ll ever make! So, you’ll want your website to have a menu that clearly and quickly navigates people to the information they’re looking for.
Image credit: Studio Leelou
As a starting point, your website should have the following pages:
- Homepage – This is the main page of your website that most people will land on. Your homepage should provide a brief overview of who you are, what you offer, social proof, and how to get in touch. It’s you and your business in a nutshell. Adding relevant calls to action in each section, you can then link people directly to the specific page where they can find more information.
- About – People want to connect with YOU, the human behind the business! But don’t harp on about your history or the cliched stuff, always relate it back to your ideal client so you can start building a meaningful relationship.
- Service page/s – You should have pages dedicated to each photography service you provide. For example, if you offer Wedding and Family Photography, create two separate pages to spell out each service and tailor your language to each audience.
- Portfolio – You gotta walk the talk, right?! Editorial, moody or alternative, share your favourite client galleries to show off your photography style and approach.
- Contact – Turning casual browsers into leads, let people know how they can get in touch with you. Embed a contact form that sends enquiries to your email or integrates with your CRM. Provide an alternative method of contact such as an email address and/or phone number too!
These are the bare minimum pages your website should have. Depending on where your photography business is currently at, you can also launch your website with a blog section and/or available upsells such as an Album Sales & Showcase Page. Don’t forget other important pages such as your Terms & Conditions and Privacy Policy.
6. Plan the layout of each page
Serving slightly different goals, each page of your website should take your audience on a personalised journey. For example, your homepage will navigate people on where to go next while your service page will provide information about your packages and set expectations of what it’s like to work with you. So, you’ll want to take the time to map out the layout of each page to determine the flow of copy, images, and calls to action.
You can simply do this the old-school way, using pen and paper. However, if your chosen platform offers the design flexibility and customisation you need, you can also use professional wireframing tools like Figma and Adobe XD to mock up the entire website experience. The wireframe will visually represent the skeletal framework of each page on your website.
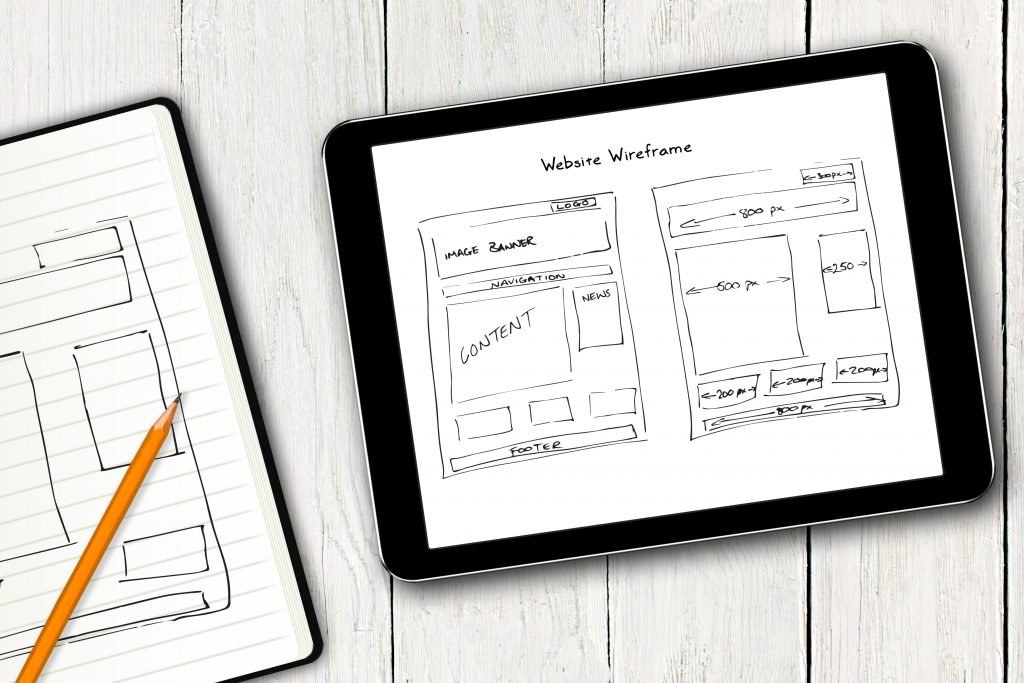
Image credit: Elementor Blog
Pre-planning each page’s layout will save you a heap of time because you’ll have a clear idea of how everything should ideally look and flow. Rather than fiddling around with the design WHILE learning how to navigate and use your website builder’s functionality.
7. Draft your website copy
Before you yell “buuuut Mel, I can’t write for shit”, don’t panic. Just as your clients have booked you as their photographer, rather than settling for taking their own blurry iPhone pics, you can outsource your website copy to a professional. As the best copywriter for photographers, I personally would LOVE to bring your words to life.
But I digress. If you want to have a go at writing your own copy, YAYYY!! Go for it!!
Here are my biggest website copy tips to give you a kick-start:
- Braindump everything into a Google Doc so you can write freely, even while you’re on the go. Plus, you’ll be able to use Google Docs’ spelling and grammar tool. Overheard a cool phrase in a podcast interview or a hilarious one-liner in a Netflix show? Write it down, save it as inspiration and think about how you can make it your own! Writing it directly in the backend of your website will only lead to you getting distracted and procrastinating, playing around with fonts, colours, layout, etc.
- Perform basic keyword research. Each page of your website, including your blog articles, serves a purpose and is an opportunity to target various search terms. You should aim to weave these search terms throughout your copy in a natural way. Learn more about SEO keyword research here.
- Make it less about you, and more about them. Don’t get carried away talking about your passion for photography or why your packages are so amazing…blah blah blah…At the end of the day, your audience wants to know how you can solve THEIR problem and serve THEM. ALWAYS relate everything you write back to your audience and why they should care. I highly recommend you read ‘Building a StoryBrand‘ to dive deeper into this concept.
- Break down your copy into short, impactful sections. If your copy reads and looks like a mouthful, most people will skim or skip straight over it, making it redundant. Break hefty paragraphs into smaller, easily digestible chunks using subheadings and line breaks. Always add breathing space!
View this post on Instagram
8. Collate your FAQs and answers
FAQs deserve a step of their own because too many people forget to include them! No matter how clear and well laid out your website is, people are always going to have questions. FAQs allow you to answer specific queries while preemptively addressing any hesitations and pain points.
Think about all the questions clients have asked you to date and shortlist the most popular, helpful ones. For example:
- “Where are you based?”
- “Can you travel interstate or overseas?”
- “Do you offer customised photography packages?”
- “How do we book you?”
- “Do you offer payment plans?”
You can place your FAQs at the bottom of your service pages, using a click-to-expand accordion treatment so can quickly jump to their specific question.
GIF Credit: Code My UI
Make sure your answers are always positive and reassuring – and let them know that they can contact you directly via your contact form or email if they still have other questions.
Want to know what else you need to include on your service pages? Click here!
9. Start building your website
Yes, it took us 8 steps to get to this point. But I’d like to think you’ll thank me later…fingers crossed. You’re already investing time, energy and money into this project, so don’t rush it. We aren’t aiming for perfection but we do want to set up the foundations of your website properly, right?!
By this stage, you should be ready to start bringing your website vision to life. You can begin building out each page, using your pre-planned layouts as a guide, and slotting in all the draft copy as you go.
If you have a couple of amazing client testimonials ready to go, you can weave these in on your homepage and service pages.

Don’t worry too much about uploading photos just yet. Let’s just get the bare bones of your website ready first!
If you can’t work out how to do something, it’s okay, don’t stress. Every website builder has its own how-to and/or troubleshooting guide, as well as a customer support team.
You can also jump into relevant Facebook groups and chat forums to ask for help. And let’s not forget the power of Google…if you’re asking the question, you can safely assume someone else has asked it before, and that our almighty Google has the answer you’re looking for.
10. Optimise & upload all your images
Aside from your portfolio page, you’ll want to break up every page with your beautiful photos for aesthetic flow. Once you’ve decided which and where images should go, make sure you optimise them before uploading them to your website backend. Image optimisation will help improve your website speed and SEO rankings.

GIF credit: Studio Leelou
Here are a few image optimisation tips:
- Choose the right file format for the right purpose – e.g. PNG, JPEG vs. GIF
- Compress & resize images for faster loading – without sacrificing quality (e.g. blurry and pixelated)
- Use descriptive, keyword-rich image file names – For example, ‘2023-Vegan-Wedding-Rupert-On-Rupert.jpg’ instead of the ‘DCIMAGE221.jpg’ generic name automatically assigned by your camera
- Optimise image alt text – alt text is the copy used to succinctly describe the image, allowing the visually impaired to understand what it’s about and search engines to crawl your site easily
More detailed information on image optimisation here.
11. Share your social platforms
Whether it’s Instagram, Facebook, TikTok, Pinterest, Twitter or elsewhere, encourage your audience to get social with you by linking your social channels. From weekend adventure reels to exciting updates, it’s a great way to “show the face behind the brand” and have fun with your audience while cross-promoting engagement across all channels.
The most popular way to share your social accounts is by adding links in your footer.

You can also embed your Instagram feed directly on your homepage, just above the website footer so it doesn’t detract from the other information on the page. Embedding your IG feed adds a dynamic element, automatically displaying your latest posts which can improve the overall quality of your website content.
12. Brush up on your SEO basics
Search Engine Optimisation (SEO) is the process of enhancing your website’s visibility when people search for services or products related to your business on Google and other search engines.
The higher your website ranks in search results, the more people are likely to click on your website to learn more about your offerings.
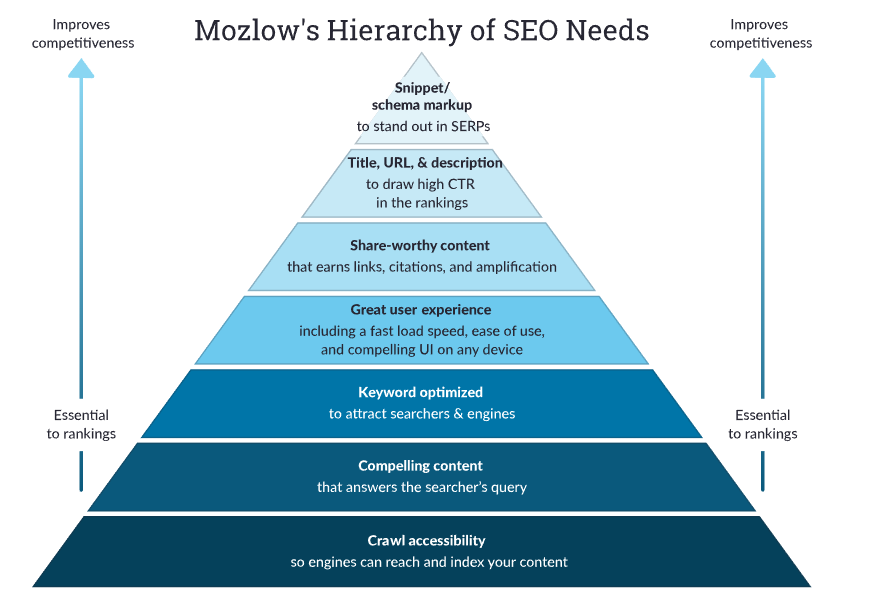
Image Credit: Moz.com
As opposed to paid advertising where you pay for each click/ interaction, SEO delivers FREE traffic to your website. This means SEO should be playing a huge part in your overall digital marketing strategy!
Before you launch your photography website, make sure you’ve covered the following SEO areas as a bare minimum:
- Optimise each page with unique page titles & meta descriptions
- Break up your optimised content with keyword-rich H1 headings & H2-H6 subheadings where relevant
- Optimise your images (refer to step 10)
- Ensure great user experience – e.g. desktop and mobile-friendly experience, fast site speed, no broken links, ease of use, etc.
- Add links between all your pages, relevant to your audience’s website journey
(Psst..as an SEO copywriter for photographers, I can help you do this.)
With ever-changing search algorithms and user behaviour, it’s important to note that SEO is a long-term, multi-pronged strategy with on-page, off-page and technical elements.
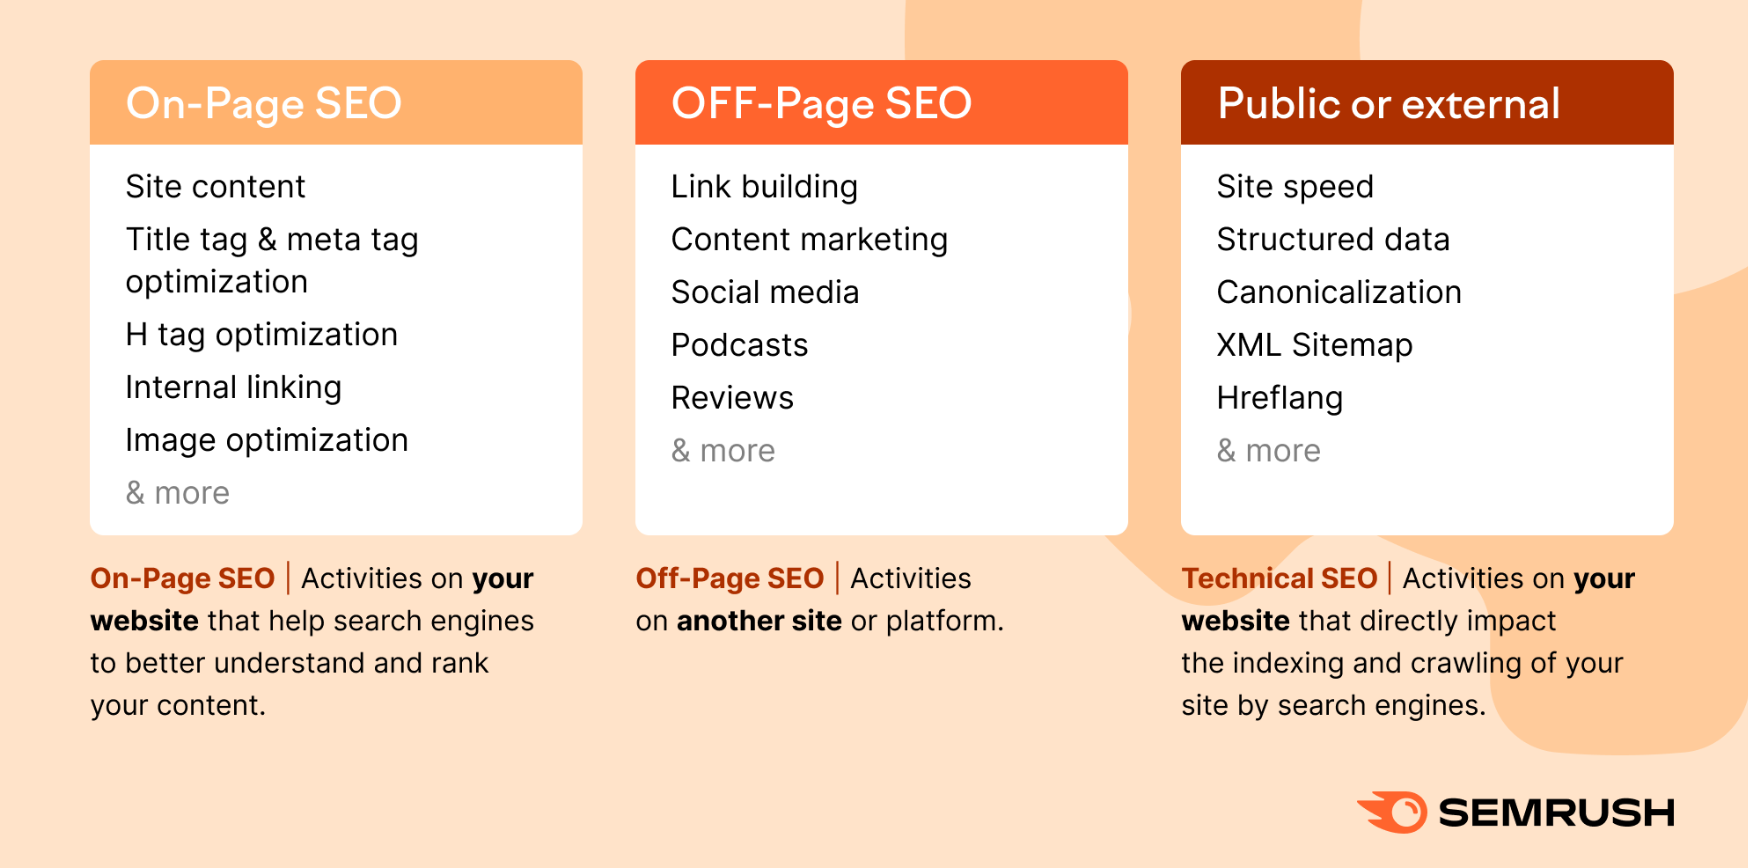 Image credit: SEMrush
If in doubt, it’s best to outsource your SEO strategy and implementation to an expert. Check out Dylan Howell’s introduction to SEO for Photographers here. You can also dive deeper into SEO tips for beginners through these guides from Moz and Ahrefs.
13. Prioritise your website’s mobile experience
There’s about a 50% chance that you’re reading this monster of a blog on your phone right now…and if so, power to you for sticking with me and scrollllllllling this far down the page.🙌🤪
I reckon it’s also safe to assume that you’ll be building your new website and playing around with the layout on your desktop.
PSA: Don’t forget about your website’s mobile experience!! In fact, make it a top priority.
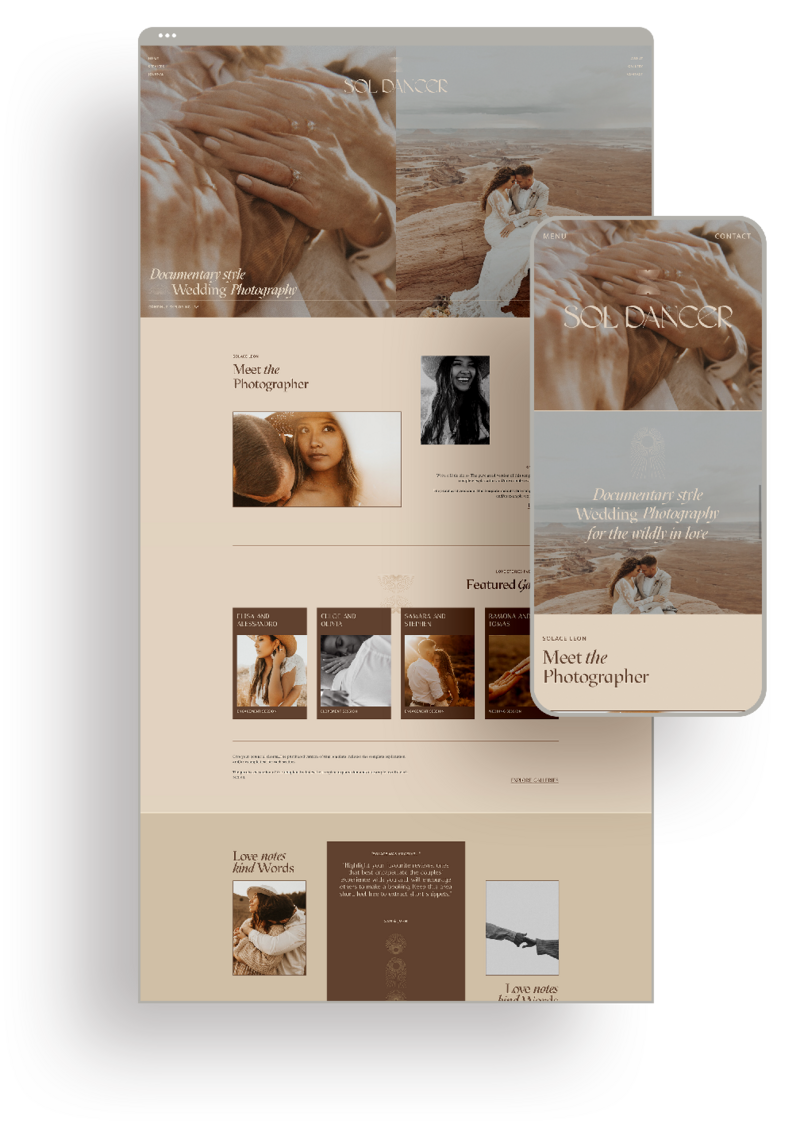
Image credit: Studio Leelou
With mobile devices generating 54.4% of global website traffic, and Google prioritising mobile-first websites, it’s essential that your website is designed for both desktop and mobile.
Here are some mobile-friendly website tips to get you started:
- Use a responsive design to ensure your website can seamlessly adapt to any device
- Keep your navigation menu simple
- Reduce large blocks of text to minimise excessive scrolling
- Optimise the size of your buttons and how they’re distributed throughout the page
- Ensure forms are easy to fill out
- Optimise your mobile site speed
- If using pop-ups, make sure they’re easy to close
While some website platforms will adapt your desktop design into a mobile-friendly layout, you will still need to make adjustments to ensure the best possible experience. If you choose to build your site through Showit, you’ll be able to create your mobile design from scratch which offers much-needed flexibility!
14. Create a pre-launch checklist
You want to have a checklist that you can refer to, and make any necessary notes, BEFORE officially setting your site live.

This website pre-launch checklist is designed to outline some basic requirements (but is by no means the be-all and end-all):
- Proofread all copy – Make sure that all your website copy reads and flows well, proofing your spelling and grammar. You can ask a friend to help with this too!
- Check ALL links – Go through your entire site with a fine tooth comb, every page from top to bottom, and click on every single link. Make sure that every link and every call-to-action button is linking correctly with no broken or 404 links. If you are linking to another website (e.g. clicking the link takes the reader to a different website), have the link set to “open in a new tab”. Don’t forget to check all the links in your footer as well as social media icons.
- Images & Graphics – Make sure every page is picture-perfect and all visuals are loading correctly.
- Design & Styling – Check that all your branding has been implemented consistently and correctly, from colours to fonts.
- Contact form – Ensure your contact form (and any other forms on your website) covers all the information you require and is displaying correctly across all devices. Double-check that submissions are correctly saved and connected with your email or preferred CRM.
- Secure your site with an HTTPS – An SSL certificate, HTTPS is a must for encrypting your website (e.g. https://jailong.co and not http://jailong.co) and it’s also a part of Google’s search ranking requirements. Some website hosts will offer free SSL, if not, you’ll need to manually obtain and install an SSL certificate.
- Compliant with all applicable laws – Depending on your business and location, there will be applicable laws and regulations, as well as best practices. For example, requesting cookie permissions, accessibility standards, usage rights, terms and conditions, privacy policies, etc. Please consult with a legal expert to cover all your bases.
15. Launch Time, Baby!
Your website will never be 100% perfect – and you don’t want it to be perfect either. Treat your website as a living, breathing thing that’s always evolving with your biz, committing to checking and updating it regularly. Never set and forget it!
But if you are satisfied that you’ve covered all the above steps, more or less, then it’s time to launch your website! The sooner you launch it, the sooner you can start enhancing your online presence, attracting visitors, and making further improvements.
At this stage, we’re just setting your website live (without announcing it to the world) so we can proceed with the next post-launch items.
16. Set up Google Search Console
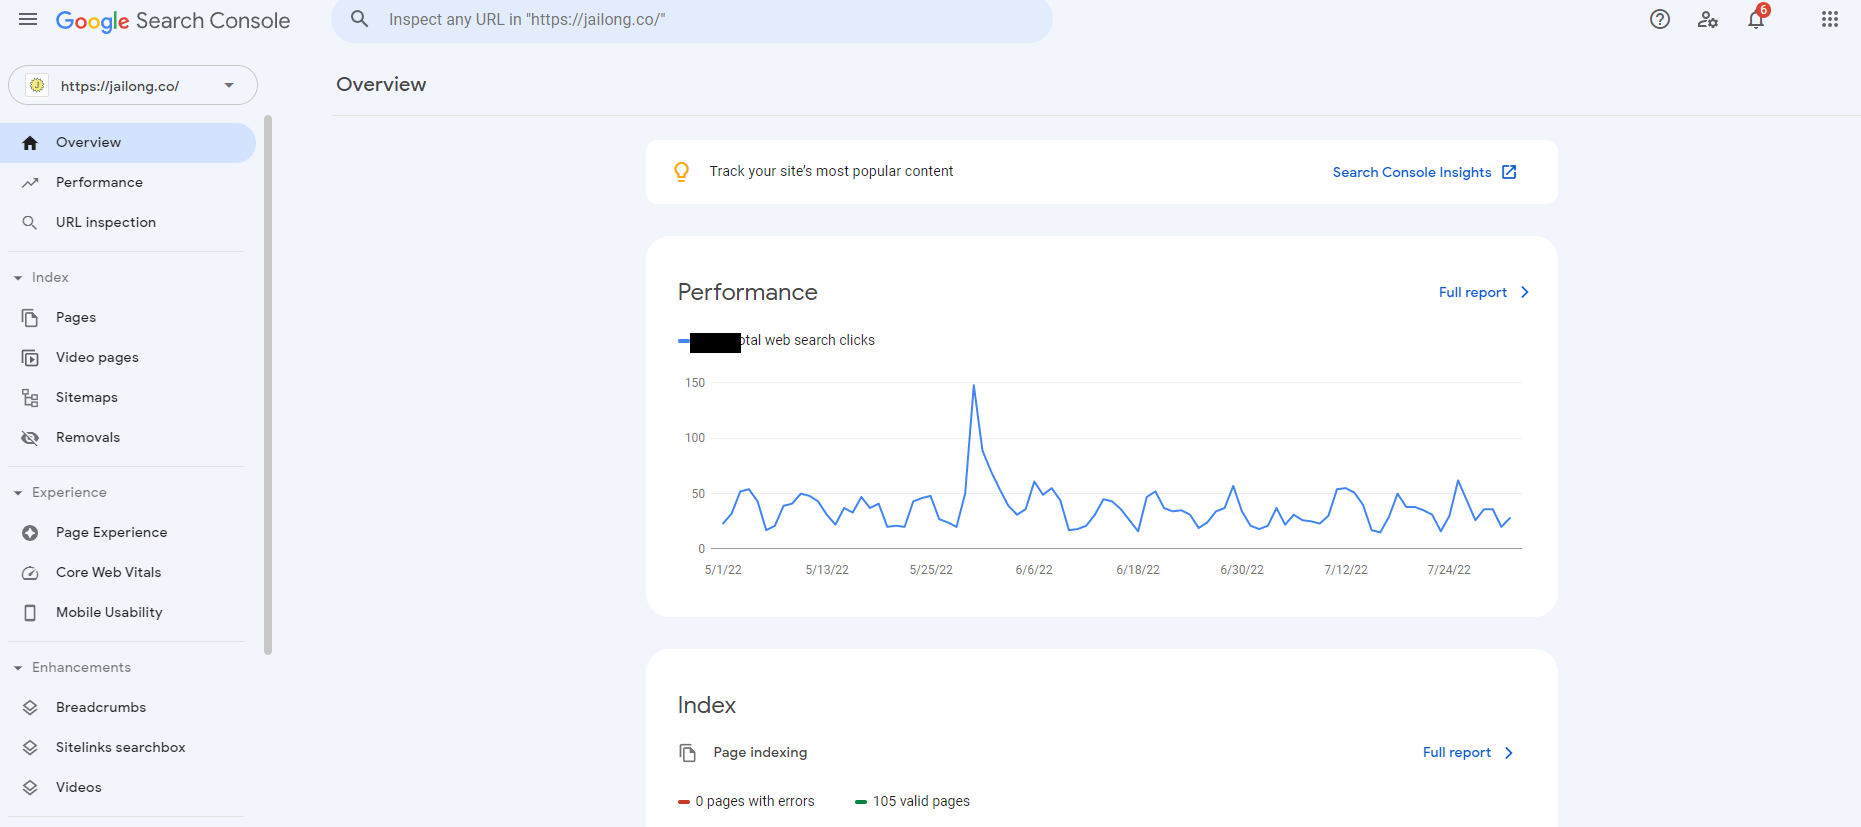 Google Search Console provides all tools and reports you need to track your site’s search traffic, review issues, and improve its performance. You will also need to submit your sitemap/s to Search Console for Google to crawl and index.
More info on how to set up your Google Search Console.
17. Add all tracking tools & integrations
If you want results, you must actively track your website’s performance! Firstly, you’ll want to link your website with Google Analytics to capture all incoming data and analytics. If you are new to Google Analytics, get started here.
GIF credit: Google Marketing Platform
Secondly, set up and install a Meta Pixel on your website so you can track visitors’ interactions on your website. Even if you’re not planning to run any Facebook or Instagram ads yet, the pixel will start collecting helpful data right away – and the more data you have, the better!
You will need to have a Business Manager account to manually connect your unique Meta Pixel with your website. More info from Meta here.
If you are using any other integrations or plugins, such as a CRM, Hotjar or Messenger Chat Plugin, now is also the time to do so.
18. Test user experience on mobile & desktop AGAIN
Now that your site’s live, it’s essential that you go through your website with a fine tooth comb AGAIN, to triple-check the overall user experience. Ideally, you’d want to do this on multiple devices to note any necessary tweaks – for example, on your desktop computer, laptop, tablet and mobile. It’s also a good idea to test on different mobile phones, e.g. iPhone vs. Android, as there will be differences between all devices, makes, and models.
While it’s impossible to perfect the experience across every single existing device, please ensure the mobile and desktop experience is optimised functionally and aesthetically. Remember to test-run all forms on your website to check that all submissions are being alerted and stored successfully.
This is also a great opportunity to ask your family and friends to explore your website and provide feedback on their experience.
19. Review site speed
It doesn’t matter how amazing your website is if it’s taking too long to load. The speed – or lack of it – can make or break your website. The longer it takes to load, the more people will abandon your site to find a solution elsewhere. In fact, 53% of visitors will leave a site if pages are taking longer than 3 seconds to load. This not only creates user frustration but can also negatively affect your SEO rankings.
Test and cross-check your website speed across a number of tools such as PageSpeed Insights, GTmetrix, and Pingdom. Review (and implement where possible) their collective feedback to see how you can further optimise your site loading times.
20. Back up your site
After all your hard work, you’ll want to make sure that you have a backup solution available if worst-case scenarios happen. This will allow you to restore your website to its previously saved state, minimising downtime.
There are many ways to back up your website, from manual downloads to plugins and third-party tools, depending on your web builder/host.
21. Announce your new website to the world!🎉🥂
Ahhhhh, we’re finally here. WE MADE IT! Now that you’ve satisfactorily tested your live site, you can prep for the big celebratory announcement.
While you can start preparing for the website announcement and build hype alongside the testing period, just make sure you give yourself enough of a grace period to refine and/or fix any issues.
View this post on Instagram
There are multiple ways to announce your new website, here are some examples:
- Pre-launch – Before announcing your website is live, you can share sneak peeks and behind-the-scenes updates to build the buzz in the lead-up to your launch.
- Launch day – Let everyone know your website is officially live by announcing it across your socials and existing database. You can encourage your audience to visit and explore your site by offering a launch-exclusive giveaway. This is also the perfect opportunity to ask for any and all feedback!
- Post-launch – Continue to actively promote your new website after the initial launch announcement by sharing and linking new galleries, blogs, etc. If you’re running a giveaway, you can also keep hyping and reminding your audience to get their last-minute entries in.
W O W. You’ve made it THIS far, so hats off to you, my friend! I TOTALLY agree that this blog has turned into a bit of a word vom. #mybad But hopefully this complete breakdown will empower you with the clarity and know-how on how to approach creating and launching your new website.
If you are feeling overwhelmed, it’s only normal – and you’re far from alone! Building a website is no easy feat and takes lots of TLC to get right. The more you equip yourself with the right knowledge, tools, and support, the more confident you’ll feel.

Plus, you don’t have to (and shouldn’t) tackle your entire website yourself! Revisit your budget and capabilities to decide which parts can be reasonably outsourced to the experts.
As with anything in life, progress is better than perfection. Better to make a start somewhere than to procrastinate altogether, so start taking the small steps towards your big goals today! You’ve got this!!
Loved this blog? Here are other helpful blogs for elevating your online presence:
- 9 Blogging Tips for Wedding Photographers
- How to Build Brand Trust with Your Clients
- 5 Pinterest Tips for Your Wedding Photography Business
P.S. We’ll be working on a comprehensive PDF with even more website tips and tricks, so subscribe to our newsletter and keep your eyes peeled!

")


I love this Blog!!! My favorite part is the contents table, i didn’t feel guilty jumping to the section i needed at the moment.
I’m the initial steps of making my website, pre-planning, planning and I’ll come back when I get to the Post-launch steps!
Thanks a bunch for this gemstone 🙂